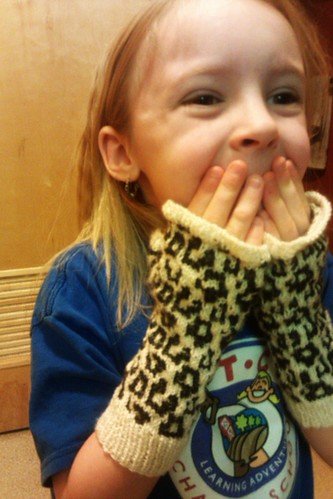
Knitting designer, Nakia Casey, had asked me to test knit her recent pattern, "Rowr Mitts" (Ravelry download here). It's a colorwork design, using two colors of your choice, and a quite easy-to-knit technique called mosaic or slip-stitch. I hadn't tried this method before, so I was excited to see how it went, in comparison to fair isle. It's a very cool method, and if you haven't tried colorwork before, or don't like trying to figure out how to hold both yarns at the same time, then give this pattern a try.
My daughter loves anything animal print, so she instantly took to her little leopard mitts!
I spent about one day of knitting for each mitt, and made the child sized pair for my daughter. I used my Twisted Sock yarn for these, but would also suggest using my Classic Sock yarn as it's 100% merino and fluffy fibers love to "hug" each other while doing colorwork. You will end up knitting one row of the chart with only one color at a time, and slipping the opposite colored stitches. Then you repeat that same row once more, then switch to your other color, knit those stitches, while slipping the opposite colored stitches and repeating the same row again, one time. Then move to the next row of the chart, and so on. This method makes it fast and really simple to manage.
The charts themselves are quite clear and easy to follow. The pattern itself is well-written so there's no guess-work. Overall, I really loved the pattern itself, and am loving the end result! This is the perfect kind of knit if you want some instant weekend gratification, or have a gift you'd like to make, pronto. They're pretty versatile as well, because the adult pair uses 3 repeats of the chart for the wrist until you get to the thumb gusset, but you can easily knit two or even one repeat depending on how long you want them to be on your arm/wrist. I used my kettle dyed yarn, and it looks great! You can also try out a gradient yarn as the background, or the contrasting color to change the ending effect.
It's a great project for giving colorwork a go, for a fast knit, and it definitely makes a little statement of it's own! It also uses a very small amount of fingering yarn... I believe I used less than 150 yds for the kids mitts with 2 chart repeats for the wrist/arm. I know I could not have used that much, since I used the remainder from that 400yd skein to make my husbands "We call them Pirates" fair isle hat.
I think one of the reasons these mitts knit up so quickly is because the chart and pattern changes enough to be interesting, and has a really great rhythm to it so that you don't want to put it down. It's more fun to just keep knitting it until it's done.
Showing posts with label mitts. Show all posts
Saturday, January 8, 2011
Friday, November 13, 2009
Kiddo Mitts Pattern with pictures to show two at a time cast on
Kiddo Mitts
(in Harry Potter Gryffindor 'Apprenti Sorcier', see yarn description below)
These are on my 8 year old, who is petite and slender, but have enough ribbing stretch in them to accommodate most kids age 3 years to 8 years or more. They are easily adapted by adding in two to four stitches on the cast on edge to fit kids with larger hands and arms.
Needles: size US 2, 47" circular
Skills: magic loop, two at a time, long-tail CO, knit, purl, peasant thumb
(picture instructions below for getting started if you haven't knit two at a time on magic loop before)
I knit these two at a time on magic loop. If you prefer, you can work them one at a time on DPNs or on a circular. Just cast on like you normally would instead of following the cast on I'm giving.
~~~~~~~~~~~~~~~~~~~~~~~~~~~~~~~~
CO 48 sts and pull the end loop of the circular needle out so there are 24 sts on each side.
Push the sts back up to the needle tips and exchange the end st from each needle to close the circle. Then, pull back down so you can cast on for second mitt.
With a second ball of yarn, CO 24 sts (half of your total sts for one mitt) onto one needle for your second mitt.
Now, use your other needle to transfer these sts purlwise to your other needle.
This will put your working end where it needs to be to cast onto the other needle and close your circle by exchanging end sts like before.
Holding the working end of the yarn, ready to cast on the remaining 24 sts onto the other needle.
Two sts cast onto second needle using long tail cast on.
Both mitts cast on, circles closed by exchanging sts, with separate balls of yarn for each mitt. Ready to knit :)
Now that we are cast on and ready to go, when you are working with two at a time, you will knit along the first side of one mitt, then you will knit along one side and the other side of the second mitt, then you can finish up the last side of the first mitt and you will have completed one full round on each mitt at this point. I find it helpful to add a little stitch marker to the first mitt (or sock if I'm knitting socks) so that I always remember when I complete a full round on both. I usually just attach an clasp-type marker to the first row of knitting after I've completed a few full rounds and leave it there until I'm done.
*K2, P2* repeat in asterisks for each round, until you have knit 3" or 4" for the cuff and hand portion of the mitt. My example is knit in 4" length.
Using a waste yarn of contrasting color (important it's contrasting so you can find it easily), knit 7 sts onto waste yarn, then tuck ends inside work and pick up regular working yarn, leaving a comfortable float where you knit with the waste yarn.
Continuing knitting in pattern of K2, P2 for another 1" to 1.5" (example is knit in about 1") to complete the mitt. Use a stretchy bind off like Elizabeth Zimmermann's Sewn Bind Off
note: I usually bind off one side and then use the needle I just finished on to transfer sts onto so I can continue around in my bind off. You will only need to do this for the first mitt, as when you get to the second it's the only one left on the needles.
Carefully remove your waste yarn and put the live sts onto your needles. Knit around first 7 sts, pick up 2 sts on side, continue onto other needle, knitting other 7 sts and pick up two more sts on other side of thumb.
Continue in pattern now of K2, P2 for about 5 rnds and bind off using EZ's bind off like described above for mitt bind off.
Do the same for second mitt. Any questions or corrections, please comment or email me so I can update. Thanks!
Friday, January 23, 2009
Jim's Pirate Mitts
Argh! These things really knit up fast and fun! I think they're a great project for my first fair isle pattern. I adapted the pattern so they would fit Jim instead of me! Here's what I did....
Yarn: I used worsted weight - black (MC) & off white (CC). Cascade 220 as Jim likes simple, sturdy wools for his hands.
Needles: I used 16" circulars in size 7 (two).
Mods: Besides upsizing my needles and yarn weight, to do them "mitt style" I worked the regular chart until row 31, and then I did row 32 completely in my MC (black), row 33 completely in my CC (white), and row 34 completely in MC (black). To prevent rolling, I began a 1x1 ribbing in both CC & MC like the cuff had. I did 3 rounds of ribbing, and then did one final round of MC. I finished it off with a sewn bind off, continuing in black.
The thumb was worked like the directions, but I picked up an additional 5 stitches to make it a total of 23 stitches to fit my husband's thumb. I worked the chart for a total of 6 rounds, then one round of MC, and the sewn bind off to create an open thumb.
Final Measurements:
Length - 9.5" approx.
Width - 8" approx.
Thumb - 4" approx.
I'm fascinated by the checkerboard and stripes in black and white. It's sort of swirling around in my head along
with the Alice in Wonderland ideas I have. I love this pattern. I think I'm going to have to make the pirate hat also.
Subscribe to:
Posts (Atom)